Mastering How to Cut Crown Molding:
Master the art of how to cut crown molding angles with precision. Learn the techniques and tools needed for flawless installations.
CUTTING CROWN MOLDING
Welcome to our guide on cutting crown molding with precision! Crown molding is a beautiful addition to any space, adding a touch of elegance and sophistication. However, achieving accurate cuts and perfect angles can be challenging, especially when dealing with compound angles. In this in-depth guide, we will explore the process of using a degree finder to measure your wall corner and setting up your saw accordingly. With the right knowledge and techniques, you'll be able to achieve flawless crown molding cuts that elevate the aesthetic appeal of your home.
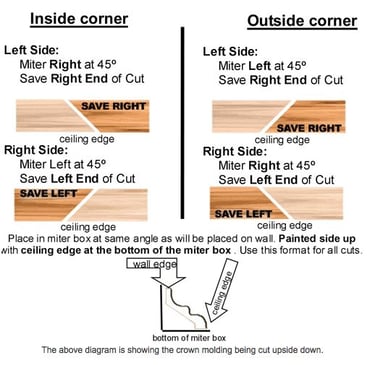
To cut crown molding accurately, you must place the molding upside down and backwards in your miter saw, with the ceiling edge against the saw’s base and the wall edge against the fence.
Key Takeaways
The Orientation Rule: Always place the "top" of the molding on the saw bed.
Miter vs. Coped: Miter cuts are for outside corners; coping is preferred for inside corners.
Measure Twice: Always measure from the bottom (wall-side) edge of the molding.
Safety First: Use a sacrificial fence or "stop block" to keep the molding stable.
How Do You Set Up a Miter Saw for Crown Molding?
To set up your miter saw for crown molding, the most reliable method is the "upside down and backwards" technique. This involves tilting the molding at its spring angle against the saw fence. By doing this, you can perform simple 45-degree miter cuts rather than complex compound bevels, ensuring much tighter joints.
In my experience, the biggest mistake beginners make is trying to lay the molding flat. Unless you have a high-end saw and a "cheat sheet" for compound angles, laying it flat is a recipe for wasted material.
I always recommend using stop blocks. These are small pieces of wood clamped to your saw's base that lock the molding into its specific "spring angle" (usually 38° or 45°). Once that block is set, every cut you make will be at the exact same pitch, which is the secret to those gap-free corners.
What Is the Best Way to Cut Inside vs. Outside Corners?
The "Snippet Sandwich": For inside corners, the most professional result is achieved by "coping" the joint—cutting one piece straight and back-cutting the profile of the second piece. For outside corners, you must use a standard miter cut where both pieces are angled at 45 degrees to meet at a 90-degree point.
Measuring and Setting Saw Angles:
To determine the proper angles for cutting crown molding, you can utilize a degree finder to measure the degree of your wall corner. Once you have the corner degree, divide it in half to determine the angle at which you should set your saw. For instance, if you measure an inside corner at 92°, you would set your saw to half of that degree, which is 46°.
Also when you install and cut crown molding, it's crucial to determine the spring angle of the molding. The spring angle is the angle between the back of the molding and the wall when the bottom of the molding is firmly pressed against the wall. Knowing the spring angle is necessary to make precise cuts and ensure a tight fit. There are three common spring angles: 38, 45, and 52 degrees, and each is suitable for different ceiling heights and positions. To determine the spring angle, you can use a scrap piece of wood and a 45-degree block, a framing square, or a piece of paper. Once you know the spring angle, you can adjust the miter and bevel angles on your saw to make accurate cuts. If you set your saw for a miter cut based on an incorrect spring angle, the molding won't fit correctly, resulting in gaps in joints and corners that need fixing. Therefore, it's important to measure the spring angle of each piece of crown molding to ensure they all have the same spring angle. Don't forget to visit the spring angle calculator page on this website to find the correct spring angle for your project and achieve a perfect cut every time.
There are two popular methods for cutting crown molding angles:
The upside-down and backwards method (vertically nested) and the compound method (flat). In the upside-down method, you position the crown molding upside down on your miter saw. This way, one of the crown mold's surfaces rests on the saw's table, while the other is against the saw's fence. By following this method, you can make accurate cuts at 45° or any other angle required by the inside or outside corner. This approach offers greater stability during the cutting process, ensuring precision. Another advantage of cutting crown molding upside down is that you can easily see the mark made on the bottom side when measuring for length.
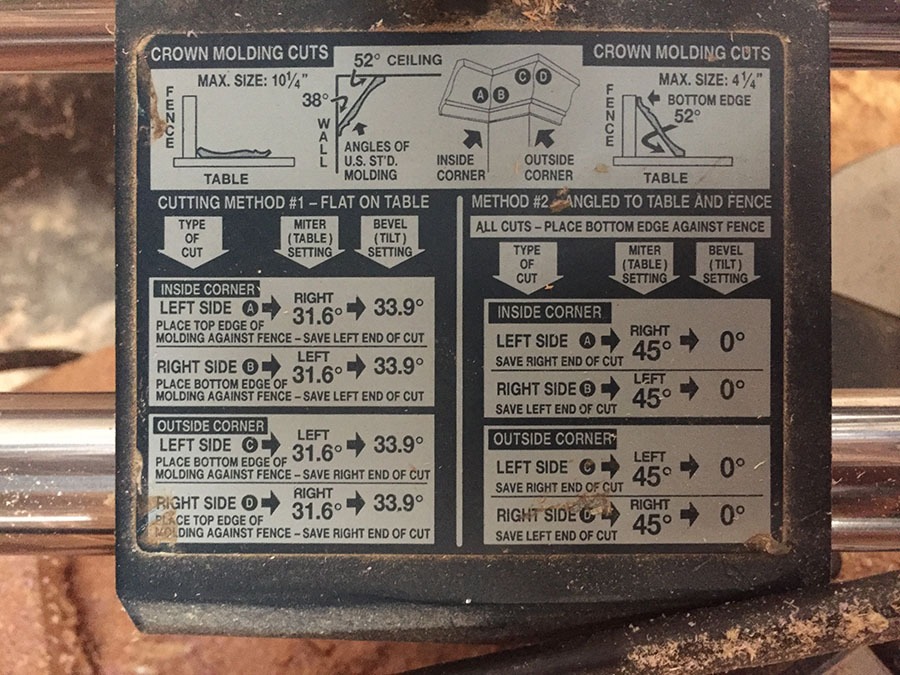
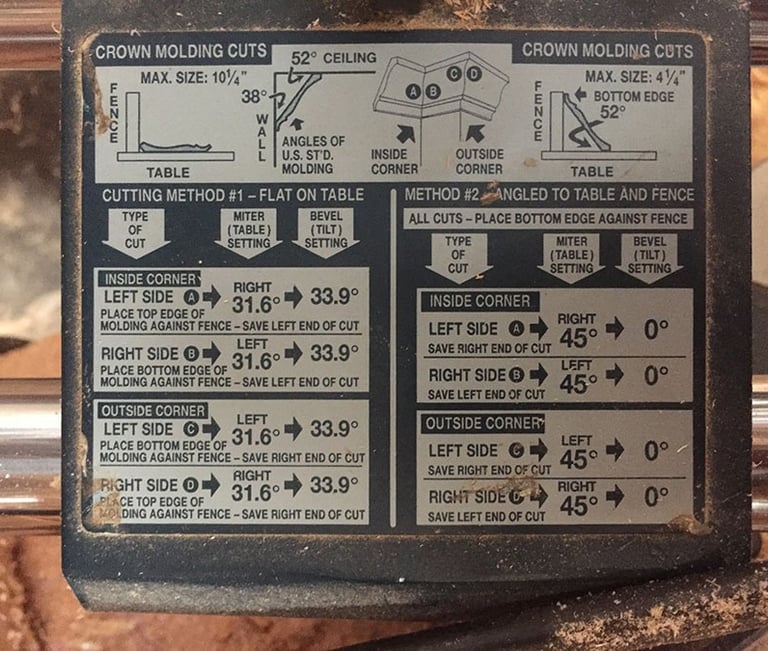
The compound method involves laying the crown molding flat on the saw, with the saw set to bevel left at 33.9° (or 33.8° on some saws). The miter angle will vary depending on whether you're making right or left cuts, but the setting remains the same at 31.6°. In some cuts, the bottom of the molding will rest against the fence, while in others, it will be on the top. This variation depends on whether you're making right or left-hand cuts. It's worth noting that the bottom of the crown molding is the side with the decorative profile.
Step-by-Step Guide: How to Cut Crown Molding:
Measure and mark the crown molding based on the specific dimensions of your project, ensuring accuracy.
Use a degree finder to measure the degree of your wall corner, and divide it in half to determine the angle for setting your saw.
Set up your saw according to the determined angles. For the upside-down method, where the crown molding is positioned upside down on the miter saw, adjust the miter angle to the desired degree, such as 45° for a standard inside or outside corner. Ensure that the bevel angle is set at 0°. In the compound method, where the crown molding is laid flat on the saw, set the bevel angle to the determined degree, such as 33.9°, and adjust the miter angle to 31.6° for both right and left cuts.
Position the crown molding on the saw table, aligning it according to the chosen cutting method. In the upside-down method, one surface of the crown molding should rest on the table, while the other surface should be against the fence. In the compound method, the bottom of the crown molding, with the decorative profile, should be against the fence.
With the crown molding securely positioned, carefully make the cuts according to the marked measurements and the angles set on the saw. Take your time and ensure the crown molding remains steady throughout the cutting process. Remember to follow safety guidelines and use appropriate safety equipment, such as goggles and gloves.
Once the cuts are complete, remove the crown molding from the saw and dry fit the pieces together to check their accuracy and fit. Make any necessary adjustments or refinements if needed.
When you are satisfied with the dry fit, proceed to install the crown molding. Apply a suitable adhesive to the back of the molding or use finishing nails to secure it to the wall. Ensure that the pieces align properly and create seamless joints.
Fill any gaps or nail holes with wood filler, and sand the crown molding for a smooth and polished finish. This step is essential for achieving a professional-looking result.
Depending on your preference, you can leave the crown molding as is or apply a coat of paint or stain to enhance its appearance. Choose a color that complements your room's decor and style.
Step back and admire your beautifully installed crown molding. Appreciate the craftsmanship and attention to detail that went into achieving precise cuts and angles. Enjoy the elevated elegance and visual impact that crown molding brings to your living space.
Mastering the art of cutting crown molding angles is a valuable and learnable skill that will allow you to transform any room into a sophisticated and visually stunning space. Remember, accuracy and patience are crucial when working with crown molding. Take the time to measure carefully, set up your saw accurately and execute the cuts with precision. Practice on scrap pieces before working on your final crown molding to ensure confidence and proficiency. With the proper tools, techniques, and a meticulous approach, you can achieve flawless crown molding installations that enhance the architectural beauty of your home. Embrace the challenge, hone your skills, and let your creativity flourish as you embark on the journey of cutting and installing crown molding with confidence.
Now, armed with the knowledge gained from this comprehensive guide, it's time to unleash your creativity and embark on your crown molding projects with newfound expertise. Happy cutting and installing!