Crown Molding Spring Angles
Discover the art of flawless crown molding installations by mastering crown molding spring angles. Learn expert techniques for a perfect finish.
INSTALLATION TIPS
Crown molding is a classic architectural element that adds elegance and visual appeal to any room. However, many people are unaware that crown molding comes in three different spring angles, each serving a specific purpose. The spring angle refers to the tilt at which the crown molding sits against the wall, and it is crucial to consider this factor before installation to achieve the desired aesthetic and ensure a seamless fit. In this comprehensive guide, we will explore the importance of understanding crown molding spring angles and delve into the intricacies of finding the ideal angle for your project.
Understanding Crown Molding Spring Angles:
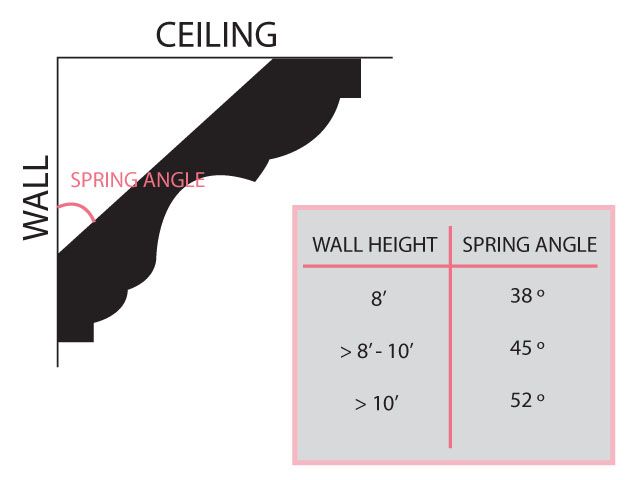
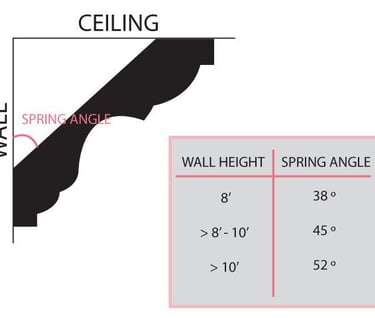
Crown molding is manufactured with different spring angles to showcase its intricate details at varying wall heights. For example, when working with lower ceilings, tilting the crown molding upwards towards eye level enhances its visibility and creates a visually pleasing effect. Conversely, in rooms with higher ceilings, a downward tilt provides the best viewing experience. By utilizing the appropriate spring angle, you can optimize the visual impact of your crown molding installation.
Determining the Crown Spring Angle:
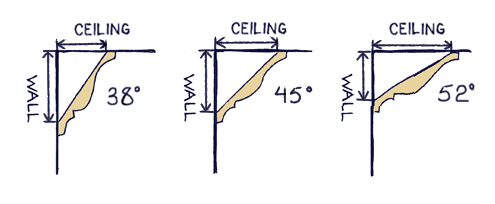
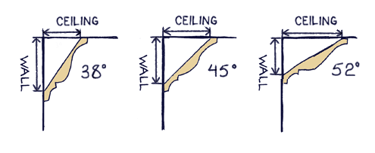
Finding the correct spring angle is essential to ensure a flawless installation. Each piece of molding must have the exact same crown spring angle for it to fit seamlessly together. Crown molding typically comes in three standard spring angles: 38°, 45°, and 52°. Determining the spring angle for your specific crown molding is a relatively straightforward process.
To find the crown spring angle, begin by cutting a small section of molding and hold it up the way it is intended to be mounted on the wall and ceiling. Measure from the ceiling down the wall to the point where the molding touches the wall, and then measure from the wall across the ceiling to the point where the molding touches the ceiling. Comparing these two measurements will reveal the crown spring angle.
If the measurement from the wall to the ceiling is longer than the measurement from the ceiling to the wall, the spring angle is 38°. On the other hand, if the measurement from the ceiling to the wall is longer, the spring angle is 52°. If both measurements are the same, the spring angle is 45°. Understanding this simple measurement technique will help you identify the precise spring angle of your crown molding.
Importance of Crown Molding Spring Angles in Installation:
Accurate knowledge of the crown molding spring angle is crucial for a successful installation. Matching the spring angle ensures that the molding fits precisely against both the wall and the ceiling, eliminating unsightly gaps or misaligned joints. Installing crown molding with the wrong spring angle can result in noticeable imperfections and compromise the overall aesthetics of the room.
Once you have determined the crown spring angle, it is time to make the perfect cut. The corner angle, in conjunction with the spring angle, dictates the appropriate miter angle for cutting the molding accurately. Achieving seamless corners requires precise measurements and calculations, which can be simplified using tools such as miter saws and angle finders.
Tips and Techniques for Installing Crown Molding:
Installing crown molding can be a challenging task, but with the right techniques and a thorough understanding of spring angles, you can achieve professional-quality results. Here are some valuable tips and techniques to guide you through the installation process:
Proper Measurement and Planning: Accurate measurement is vital to determine the quantity of molding required for the project. Plan your cuts and layout carefully, accounting for corner angles and the direction of the molding.
Prepping the Molding: Before installation, it is essential to prepare the molding properly. Sand any rough edges and ensure the ends are clean and square for precise cuts and seamless joints.
Cutting Techniques: Utilize appropriate tools such as a miter saw to achieve precise cuts. Remember to adjust the saw angle to match the calculated miter angle based on the spring angle and corner angle.
Dry Fitting: Perform a dry fit of the crown molding before attaching it permanently. This step allows you to ensure a proper fit and make any necessary adjustments before securing the molding in place.
Securing and Finishing: Use construction adhesive and/or nails to secure the crown molding firmly. Fill any gaps or nail holes with wood filler, and finish the molding with paint or stain to enhance its visual appeal.
Crown molding spring angles play a significant role in achieving a flawless and visually appealing installation. Understanding the importance of spring angles and learning how to determine the correct angle for your specific crown molding is crucial for a successful project. By utilizing the information and techniques provided in this comprehensive guide, you can confidently embark on your crown molding installation journey, transforming ordinary spaces into stunning, elegant rooms. Remember, precise measurements, careful planning, and attention to detail are key to achieving professional-quality results that will leave a lasting impression.